I was convinced my Samsung phone’s battery couldn’t keep up with my routine anymore. But after disabling these overlooked settings, it easily lasts the whole day.
8
Always-On Display
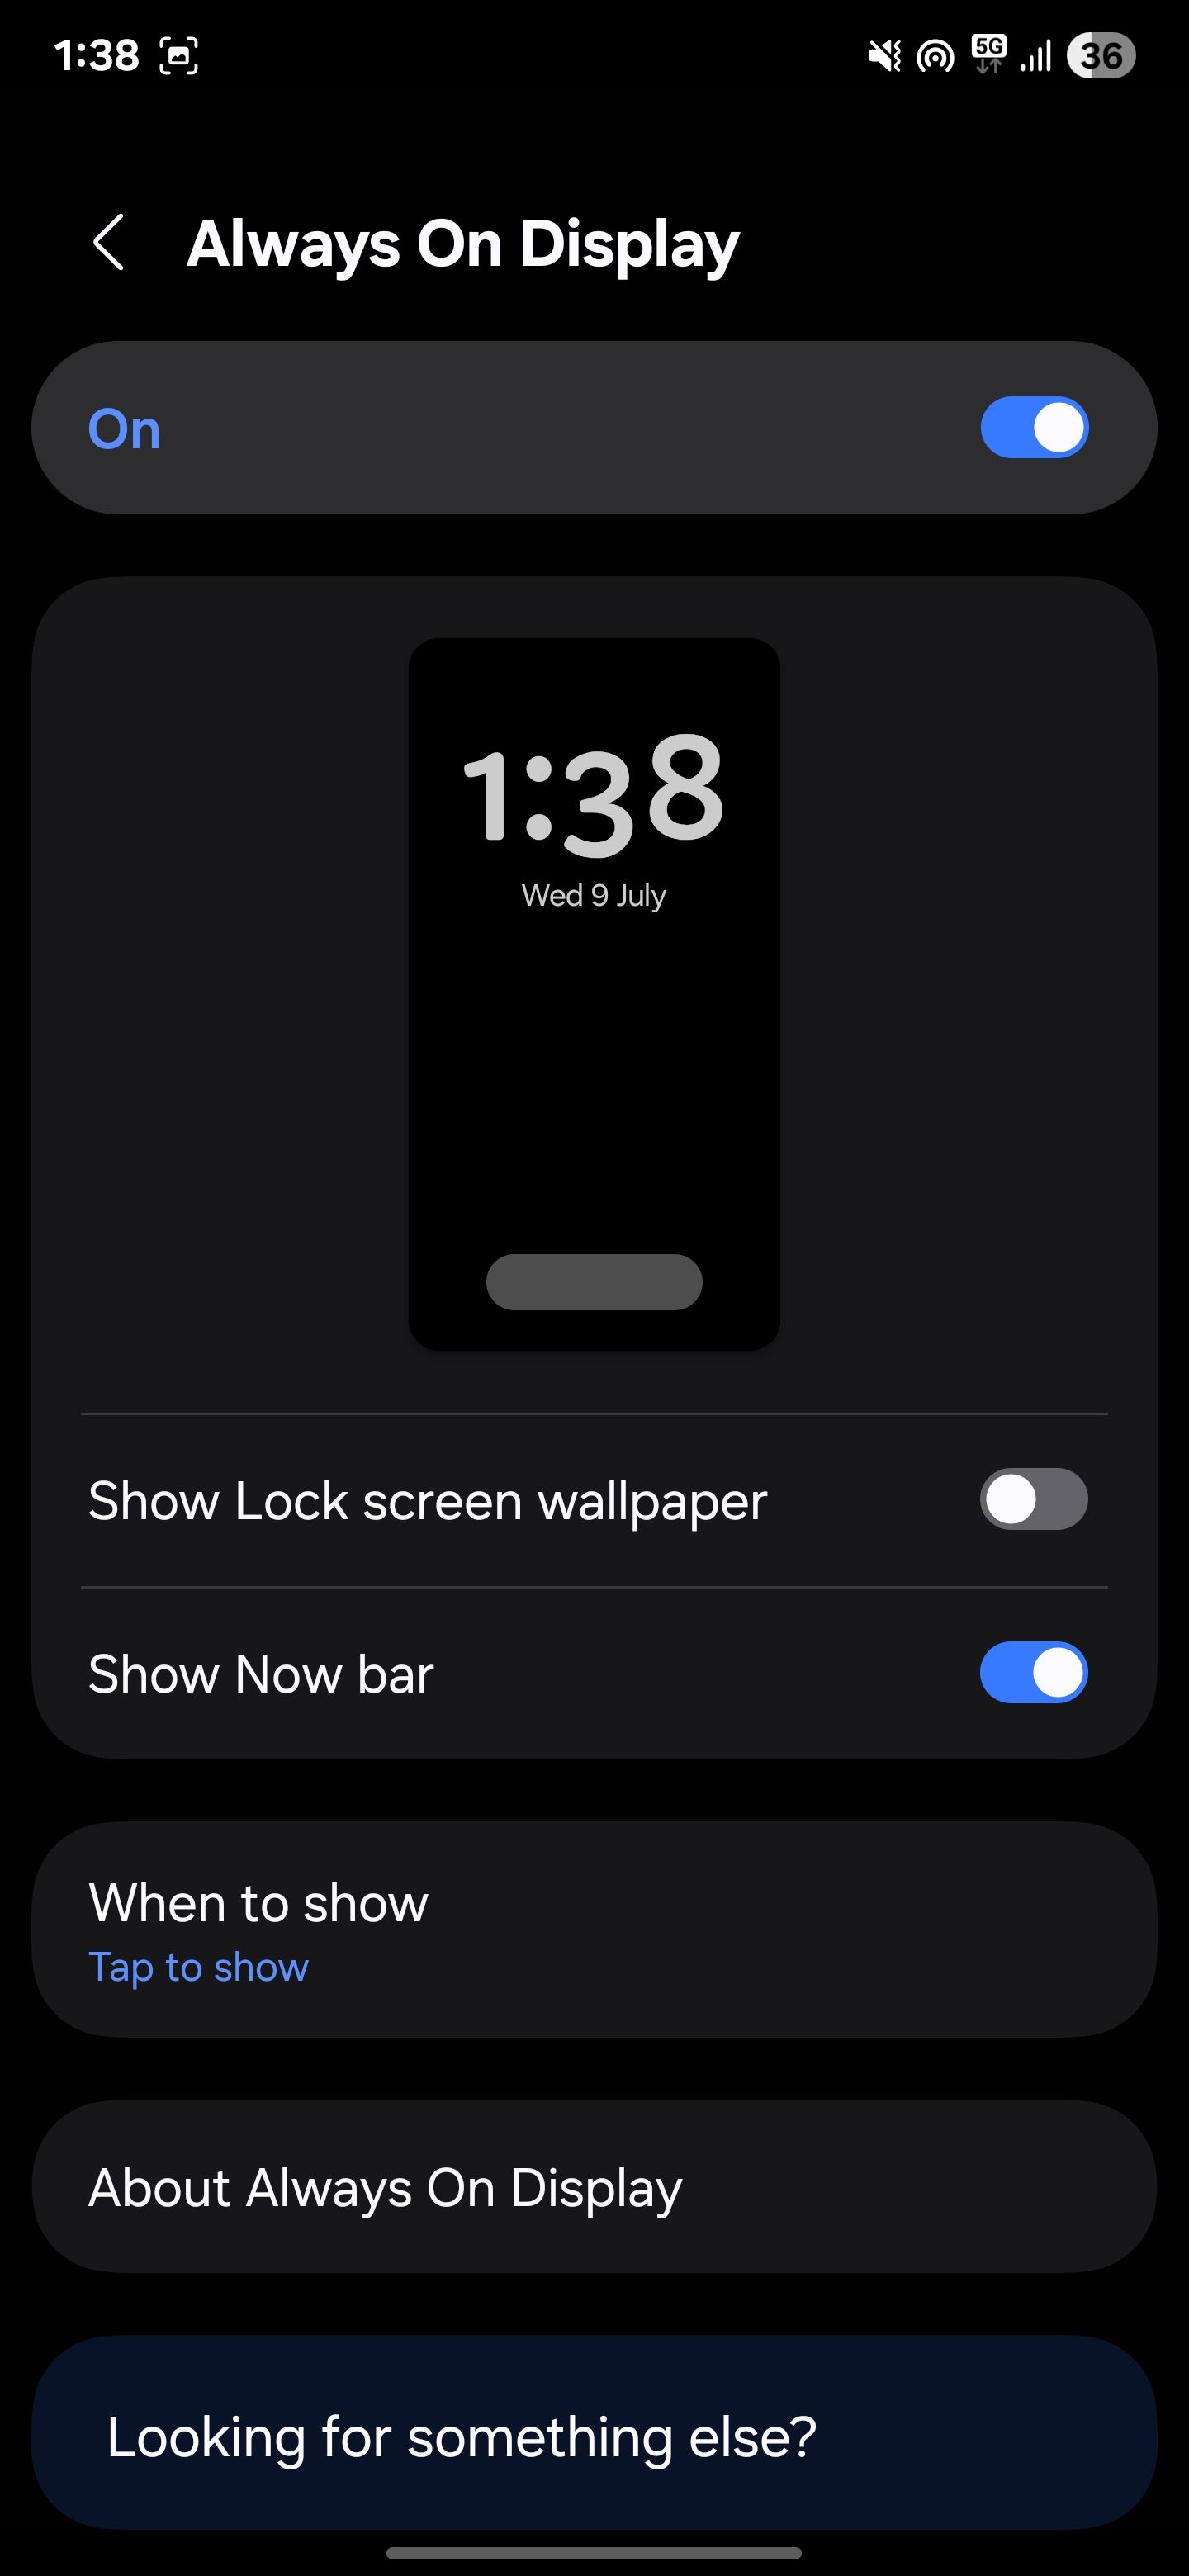
For some time, I thought Always-On Display barely used any power. After all, it’s just a dim clock on a black background, right? However, when I checked my battery usage statistics, I found that it was quietly draining a few percent every hour, even when I wasn’t using my phone.
Always-On Display keeps part of your screen illuminated—and the processor awake slightly—to show the clock, notifications, and battery status. It’s useful if you constantly glance at your phone while it sits on your desk or similar. But for me, it wasn’t worth the steady drain, so I decided to turn it off.
If you want to do the same, open Settings, tap on Lock screen and AOD, then select Always On Display. From here, you can toggle it off to disable the feature.
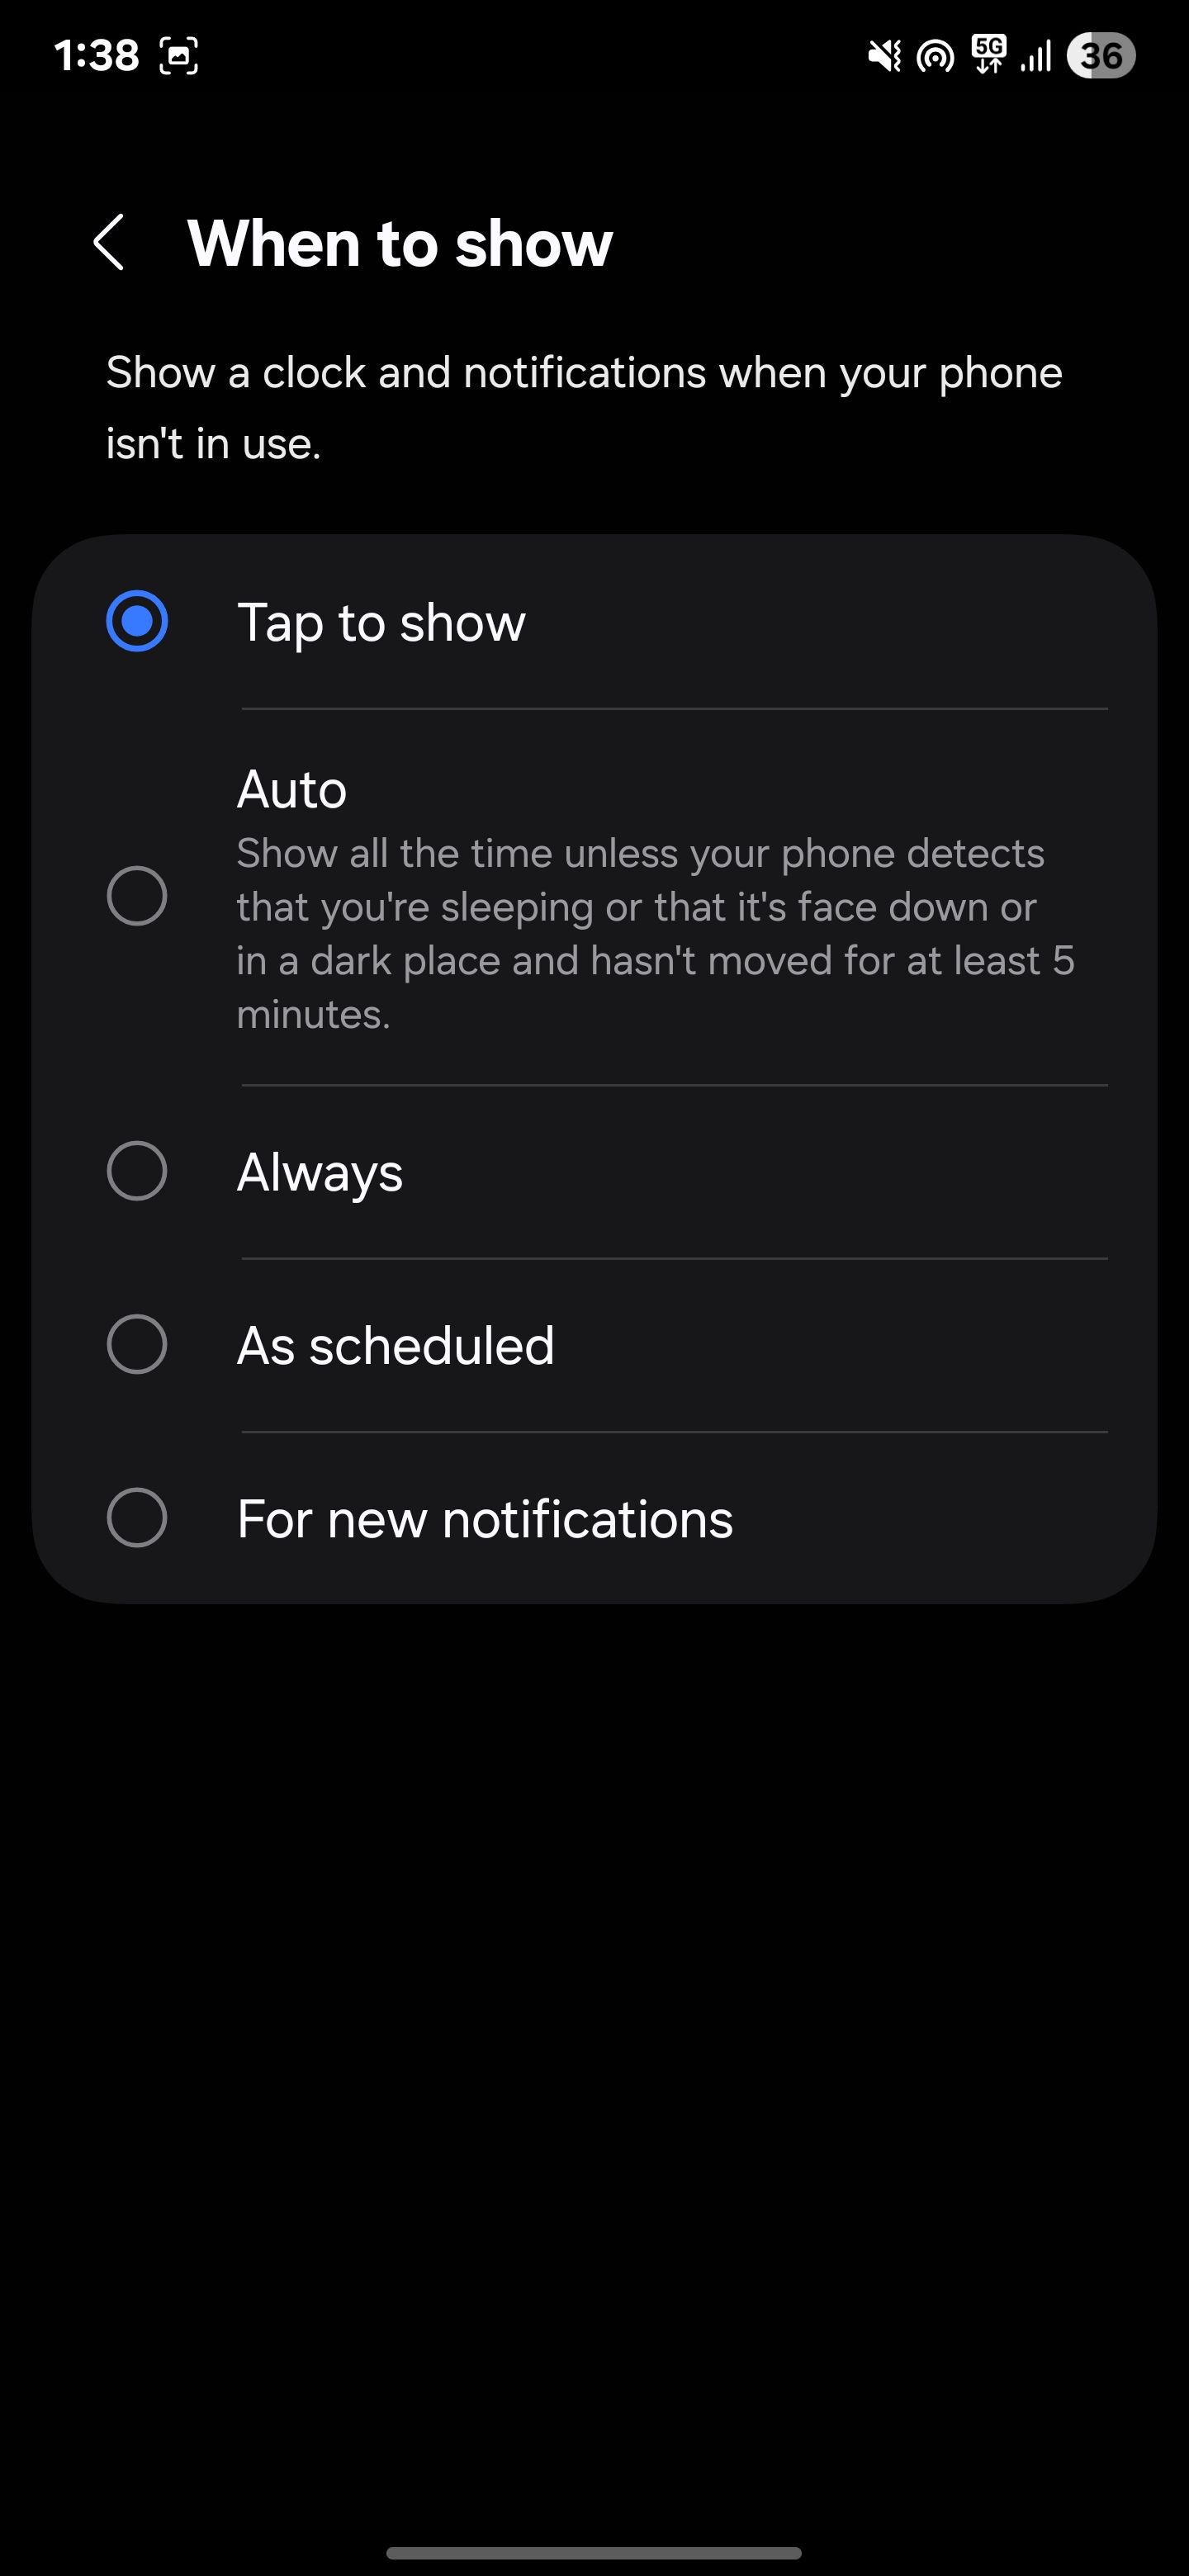
But if you find AOD helpful and don’t want to lose it entirely, you can adjust when it shows up to reduce battery drain without giving up the feature. Under the When to show section, you’ll see a few options:
- Tap to show: AOD only turns on when you tap the screen.
- Auto: Keeps it on unless your phone detects you’re sleeping, it’s face down, or in a dark place and hasn’t moved for five minutes.
- Always: Leave it on 24/7, which consumes the most battery power.
- As scheduled: Shows up only during hours you set, like during work or while you’re awake.
- For new notifications: It lights up only when you receive a new notification.


If you still want to take quick glances at the time, Tap to show or As scheduled gives you the best of both worlds.
7
RAM Plus
RAM Plus sounds like a performance booster. Samsung says it uses a chunk of your phone’s storage as virtual RAM to help with heavy multitasking. But in reality, I don’t run a dozen apps at once. Instead, it was just using up storage and creating extra background processes that cost battery life.
To turn it off, open Settings, scroll down to Device care, then tap Memory. Here, you’ll see RAM Plus at the bottom. Tap it, and you can switch it off completely or reduce its size.
Disabling RAM Plus won’t delete any data, and you probably won’t notice a difference in everyday use. But it can reduce the background load on your device and give you a bit more battery life each day, especially if you don’t need that extra virtual RAM.
6
Nearby Device Scanning
Nearby Device Scanning keeps Bluetooth and Wi-Fi scanning active to find nearby devices, even if you’re not actively connected to anything. It’s designed to make pairing faster with headphones, watches, or SmartThings devices.
But for me, I barely connect to new devices during the day. My phone was thus scanning in the background nonstop, using battery power for no real reason.
If you’d rather save battery life, turn this feature off. In the Settings menu, tap Connections, and then select More connection settings. From there, you’ll find the option for Nearby device scanning. Toggle it off, and your phone will stop scanning for nearby devices unless you explicitly open those menus.
Turning this off won’t affect your existing Bluetooth connections. Your headphones, watches, and other devices will still connect as usual. The only difference is your phone won’t waste battery power constantly searching for new devices.
5
Bixby Voice Wake-Up
I’ve never been a big Bixby user, so I didn’t realize it was always listening and waiting for the Hi, Bixby wake-up command. This means the microphone stays on, and the background processes keep running, depleting your battery over time.
You can turn off Bixby if you never use it. Alternatively, turning off voice wake-up can save you some power without completely losing the assistant. You can still access Bixby by opening the app manually or pressing the side button whenever you need it.
To turn it off, open Settings, scroll down to Advanced features, then tap Bixby. Next, select Voice registration and turn off Voice wake-up.
Once you do this, Bixby stops listening all the time, giving your battery a small but noticeable break. And if you ever change your mind, it only takes a few taps to turn it back on again.
4
Keep Screen On While Viewing (Smart Stay)
Samsung’s Smart Stay feature keeps your screen on as long as it detects you looking at it. At first, this sounds great because it prevents the screen from turning off while you’re reading or watching something, without you having to touch the display every so often to keep it awake.
However, to do this, your phone’s front camera scans for your eyes, which uses extra battery. And if your screen timeout is already set to a long value (like five minutes), Smart Stay can end up keeping your display on even longer.
For example, if you’re reading an article and Smart Stay is active, the screen stays on as long as you’re looking. But if it doesn’t detect you (maybe you’re holding your phone at an angle or glance away), it won’t turn off right away. It waits for the full five-minute timeout before going dark. In both situations, the screen stays on longer, quietly draining your battery.
To turn off this feature, go to Settings and tap Display. Then, navigate to Screen timeout and locate the option labeled Keep screen on while viewing. Toggle it off to prevent your phone from continuously using the camera to track your face.
I set my screen timeout to just 30 seconds, so my phone turns off quickly when I’m not using it. If I’m reading something long, I occasionally tap the screen to keep it awake. But if you often read articles or documents for long stretches, you might prefer keeping Smart Stay on while setting a shorter screen timeout as a backup.
That way, your phone stays on when it sees you looking at it, but it won’t waste battery for too long if it fails to detect your face.
3
Motion Gestures (Lift to Wake)
Lift to Wake automatically turns on your screen when you pick up your phone. It feels convenient, since you don’t have to press any buttons to check the time or see your notifications.
But this feature keeps your phone’s motion sensors active all day, which uses up extra battery in the background. It can also turn on the screen when you don’t need it to, like when you’re simply adjusting your phone on the table or picking it up to move it somewhere.
If you don’t need this feature, you can turn it off. Open the Settings menu, tap Advanced features, then go to Motions and gestures. Here, you’ll see Lift to wake. Toggle it off, and the screen will only turn on when you press the power button or double-tap it (if that gesture is enabled).
2
Dynamic Lock Screen
I used to love Dynamic Lock Screen because it updated my lock screen wallpaper with new images whenever I woke up my phone. It felt refreshing to see something different each time, whether it was beautiful landscapes, calming nature shots, or cool artwork.
However, behind the scenes, this feature uses background data to regularly download those new images. While it may not be a huge drain on its own, every small background process like this adds up, especially if you’re already trying to conserve your Android phone’s battery however you can.
To turn this off, open Settings, tap Wallpaper and style, then select Change wallpapers. Scroll down to Wallpaper services and choose None. This will stop your phone from downloading new images in the background.
I switched to a single static lock screen wallpaper instead. My phone still looks good, and now I know it’s not using extra battery or data to refresh images I only glance at for a moment.
1
Restrict Background Data and Activity
Of all the tweaks I made, this one had the biggest impact on my battery life. Many apps run background data and activity, syncing and updating even when you’re not using them. For apps like email, messaging, or maps, this is necessary. But for random shopping or news apps, it’s wasteful.
To manage this, I went to Settings, tapped Apps, and reviewed each app individually. Under Battery, I changed their background activity setting to Restricted wherever possible to stop them from running unnecessarily. (Keep in mind this may cause notifications and other behaviors of the app to stop working properly.)
For background data, I opened Settings, went to Connections, then Data usage, and tapped Mobile data usage. From there, I selected non-essential apps and turned off Allow background data usage so they wouldn’t use data when I wasn’t actively using them.
Since making these changes, I’ve noticed far fewer unexpected battery drops throughout the day. All my apps still work fine when I open them, but now they’re not constantly checking for updates or running processes in the background when I don’t need them to.
With these changes, your Android phone will last longer while traveling or just during your everyday routine.Each tweak might not seem like much, but together, they add up to potential hours of extra battery life. If the battery on your phone is draining faster than it should, try turning off these settings to see if it helps.
And if you want to get even more out of your battery, turn on Battery Saver when you know you won’t be near a charger. It limits background activity and performance slightly, but it’s a solid option to stretch your battery life when you need it most. Just keep in mind that you shouldn’t run Battery Saver 24/7.


